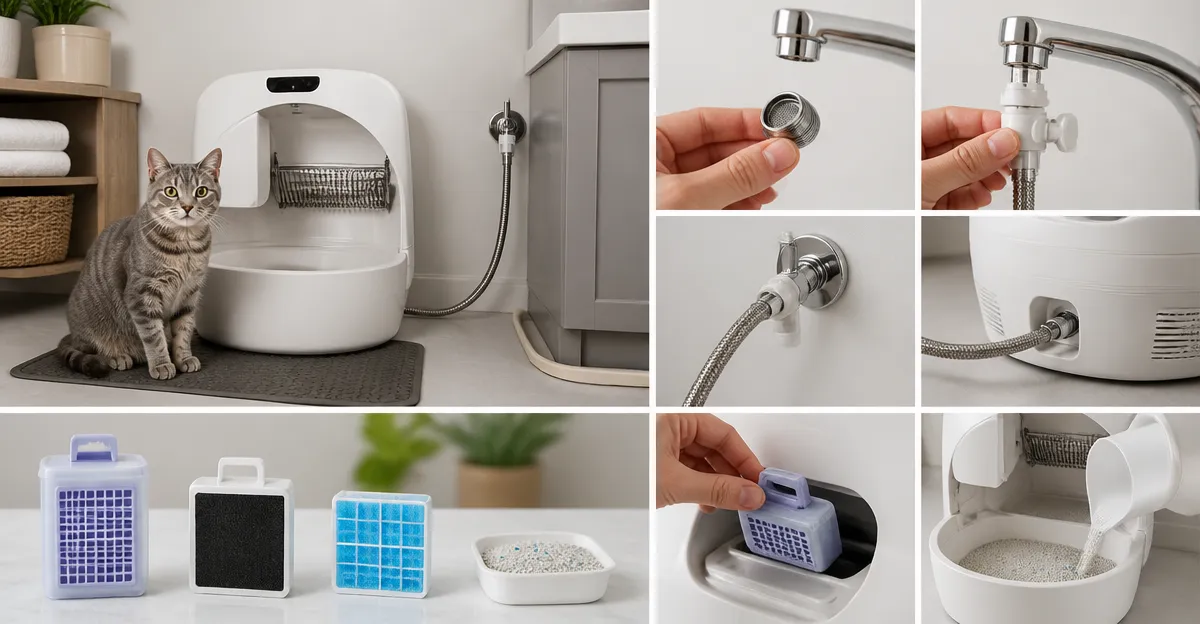
How to Install CatGenie Without Permanent Plumbing: Easy No‑Drill Temporary Hookup for Renters (Step‑by‑Step)
Introduction
One of the most common obstacles for renters who wish to adopt a self‑washing cat litter system is the lack of permanent plumbing. This guide explains how to install a CatGenie unit using a temporary faucet‑to‑garden‑hose connection, allowing the device to drain and refill without any modifications to the walls or floor. The reader will learn how to select appropriate adapters, secure a reliable water supply, maintain the cleaning cartridge, and protect the rental property from leaks. By following these instructions, a renter can enjoy a hygienic, low‑maintenance litter solution while preserving the integrity of the leased space.
What You’ll Need
- CatGenie SaniSolution Cartridge – $25.99, 4.6★ rating, 1,848 reviews
- Faucet Adapter with Aerator – $8.09, 4.6★ rating, 848 reviews
- 3/4" Brass Faucet to Hose Adapter – $9.99, 4.5★ rating, 1,319 reviews
- CatGenie GenieDome – $42.00, 4.4★ rating, 959 reviews
- Hibbent Faucet to Hose Adapter – $9.99, 4.3★ rating, 8,107 reviews
- Standard 3/4" garden hose
- Adjustable wrench (often included with adapters)
- Leak‑proof bucket or shallow pan (optional for overflow protection)
Step‑by‑Step Instructions
Step 1 – Choose the Optimal Faucet Adapter
The first requirement is a reliable method to draw water from a sink without permanently altering the plumbing. Two brass adapters are available: the Faucet Adapter with Aerator and the 3/4" Brass Faucet to Hose Adapter. Both are constructed from solid brass, ensuring durability and corrosion resistance. The Faucet Adapter with Aerator includes a built‑in aerator that prevents splashing when the hose is disconnected, making it ideal for kitchens where water spillage is undesirable. The 3/4" Brass Faucet to Hose Adapter offers a 360° swivel joint, eliminating hose twisting during use, which is beneficial for bathroom installations where space is limited. For renters who anticipate frequent removal of the adapter, the built‑in aerator version provides a smoother transition back to normal faucet operation.
- Price: $8.09 (Faucet Adapter) vs. $9.99 (Swivel Adapter)
- Rating: 4.6★ vs. 4.5★
- Key Feature: Both fit standard 55/64" male threads and include a reducer for 15/16" female threads.
Select the adapter that best matches the sink location. If the sink is in a kitchen with a removable aerator, the Faucet Adapter with Aerator provides a quick‑connect solution. If the sink is in a bathroom where hose movement is frequent, the swivel adapter minimizes kinks.
Step 2 – Install the Adapter on the Sink Faucet
Begin by turning off the faucet completely. Using an adjustable wrench or the included aerator removal wrench (provided with the swivel adapter), unscrew the existing aerator. Carefully thread the chosen adapter onto the faucet’s male threads. Hand‑tighten until resistance is felt, then give a final quarter turn with the wrench. The built‑in aerator of each adapter ensures that water flow remains controlled when the hose is not attached, preventing accidental flooding.
During installation, wear a cloth or gloves to protect the skin from the sharp threads, as recommended by the manufacturers. Verify that the adapter is seated securely by turning the faucet on briefly; a steady stream without leaks indicates proper installation.
Step 3 – Connect a Garden Hose to the Adapter
Take a standard 3/4" garden hose and attach it to the female end of the adapter. The hose should slide onto the threaded connector and can be secured with a hose clamp if desired, although most adapters provide a snug fit without additional hardware. For the swivel adapter, rotate the hose freely to confirm the 360° motion works as intended. For the aerator adapter, observe that the water does not splash excessively when the hose is disconnected.
Position the hose so that it reaches the location where the CatGenie will be placed. If the distance is short, a short hose segment reduces excess slack and limits tripping hazards. Ensure the hose is not kinked, as this can restrict water flow and affect the cleaning cycle of the CatGenie.
Step 4 – Place the CatGenie Unit and Attach the Drain Hose
Position the CatGenie on a level surface near the sink, preferably on a waterproof mat to catch any accidental spills. The unit includes a drain hose that must be routed back to the sink. Connect the drain hose to the faucet adapter’s water outlet using a small “T” fitting if necessary; many renters find it convenient to place a shallow bucket beneath the drain to catch excess water during the first cycles.
If the sink is located below the CatGenie, gravity will assist the drainage. If the unit is higher than the sink, a small pump may be required, but this guide focuses on gravity‑based setups to avoid additional equipment.
Step 5 – Install the GenieDome (Optional)
For cats that are sensitive to open litter boxes, the CatGenie GenieDome provides a discreet cover. The dome is sold separately and fits most CatGenie models. Installation involves snapping the four dome pieces together and placing them over the unit. The dome reduces tracking of pellets and contains odors, which complements the fresh‑scent formula of the SaniSolution cartridge.
- Price: $42.00
- Rating: 4.4★
- Key Feature: Easy snap‑together design, compatible with all CatGenie units.
Although the dome adds a modest cost, many renters find the reduction in litter tracking valuable, especially in apartments with hardwood floors.
Step 6 – Load the SaniSolution Cartridge
The cleaning performance of the CatGenie relies on the CatGenie SaniSolution Cartridge. This veterinarian‑grade cleaning solution lasts up to 240 washings when the Cat Activation mode is used, providing a fresh scent and a low‑level alert when the supply is depleted. To install, pull out the old cartridge, unwrap the new one, and drop it into the cartridge slot. The cartridge seats only one way due to a keyed slot, preventing incorrect installation.
- Price: $25.99
- Rating: 4.6★ (1,848 reviews)
- Key Features: Fresh scent, low‑level alert, compatible exclusively with CatGenie units.
After insertion, the CatGenie will recognize the cartridge wirelessly; no additional contact cleaning is required. It is advisable to set a reminder to replace the cartridge before the low‑level alert triggers, ensuring uninterrupted operation.
Step 7 – Power and Test the System
Plug the CatGenie into a standard 120 V outlet located near the sink. Turn on the unit and select the automatic cleaning cycle. Observe the water flow from the faucet through the hose into the unit, and verify that the drain hose returns water to the sink without leakage. The first cycle may take up to 30 minutes, as noted by customers, but this is normal for the initial flush.
If any leaks appear at the adapter connection, tighten the adapter a few more turns with the wrench. Ensure that the hose clamps (if used) are snug but not over‑tightened, which could damage the hose wall.
Step 8 – Train the Cats and Fine‑Tune Settings
Once the plumbing is verified, introduce the cats to the CatGenie. Most cats adapt quickly when the unit is placed in a familiar area. Use the Cat Activation mode for occasional manual cleaning, which extends cartridge life. Adjust the noise settings if the unit is too loud for the household; many renters find that running the unit during low‑traffic hours reduces disturbance.
Tips & Pro Tips
- Place a rubber mat in front of the faucet to catch any stray water droplets during hose removal.
- Use the low‑level alert on the SaniSolution cartridge to schedule replacements before the supply runs out.
- If the sink is shared with other household members, label the faucet adapter to avoid accidental removal.
- Consider a check valve on the drain line to prevent back‑flow into the sink, especially in homes with narrow drain pipes.
- For apartments with limited water pressure, the 360° swivel adapter (3/4" Brass Faucet to Hose Adapter) maintains flow without kinking, which improves cleaning efficiency.
Troubleshooting
| Problem | Possible Cause | Solution |
|---|---|---|
| Water leaks at adapter | Improper tightening or damaged threads | Turn off water, re‑tighten with a cloth‑wrapped wrench, inspect threads for debris. |
| CatGenie does not fill | Hose kink or blocked faucet aerator | Straighten hose, remove aerator, clean with vinegar solution. |
| Low cleaning performance | Expired SaniSolution cartridge | Replace cartridge with a new one; monitor low‑level alert. |
| Excessive noise | Unit placed on resonant surface | Place a rubber mat underneath the unit to dampen vibrations. |
Conclusion
Renters can successfully install a CatGenie without permanent plumbing by employing a temporary faucet‑to‑garden‑hose adapter, a reliable SaniSolution cartridge, and optional accessories such as the GenieDome. The process requires no drilling, preserves the condition of the rental unit, and delivers a hygienic, low‑maintenance litter environment for both cats and owners. By following the step‑by‑step instructions, the reader gains confidence to set up the system, maintain it efficiently, and enjoy the convenience of a self‑cleaning litter box.
Products Mentioned in This Guide
Frequently Asked Questions
Can I install a CatGenie in a rental without drilling or permanent plumbing?
Yes, you can use a temporary faucet‑to‑garden‑hose adapter that connects to the sink and drains into a bucket or sink without any modifications.
What type of faucet adapter is needed for a no‑drill CatGenie hookup?
A faucet adapter with a standard aerator thread and a garden‑hose coupling is required to link the CatGenie’s water inlet and drain to the sink.
How do I prevent leaks when using a temporary CatGenie connection?
Secure all hose clamps, use a watertight bucket or sink for drainage, and regularly inspect connections for drips.
Is the CatGenie SaniSolution cartridge compatible with a temporary plumbing setup?
Yes, the cartridge works the same way; it just needs a reliable water supply and proper drainage, which the temporary hookup provides.
What maintenance steps are unique to a renter’s temporary CatGenie installation?
Renter should regularly clean the hose, check adapter tightness, and replace the cartridge as recommended to avoid clogs and ensure consistent performance.